Friday, January 15, 2016

Painting With Flour & Cocoa, Say What?

One thing that Usborne Books does a fantastic job of, is making its stories come to life.  These aren't just words on a page anymore, you can actually interact with these books and children LOVE it!

I'm A Dirty Dinosaur is the book that made my family fall in love with Usborne.  The quality;  this is a hard bound book with card stock pages.  It's perfect for toddlers whom we all know can be rough at times.

Kids get to stomp, splash, slide, drum, right along with the book and it's amazing to see their faces light up while they are doing it.  Illustrator Ann James uses mud in this book which I can't wait to have fun with this summer!


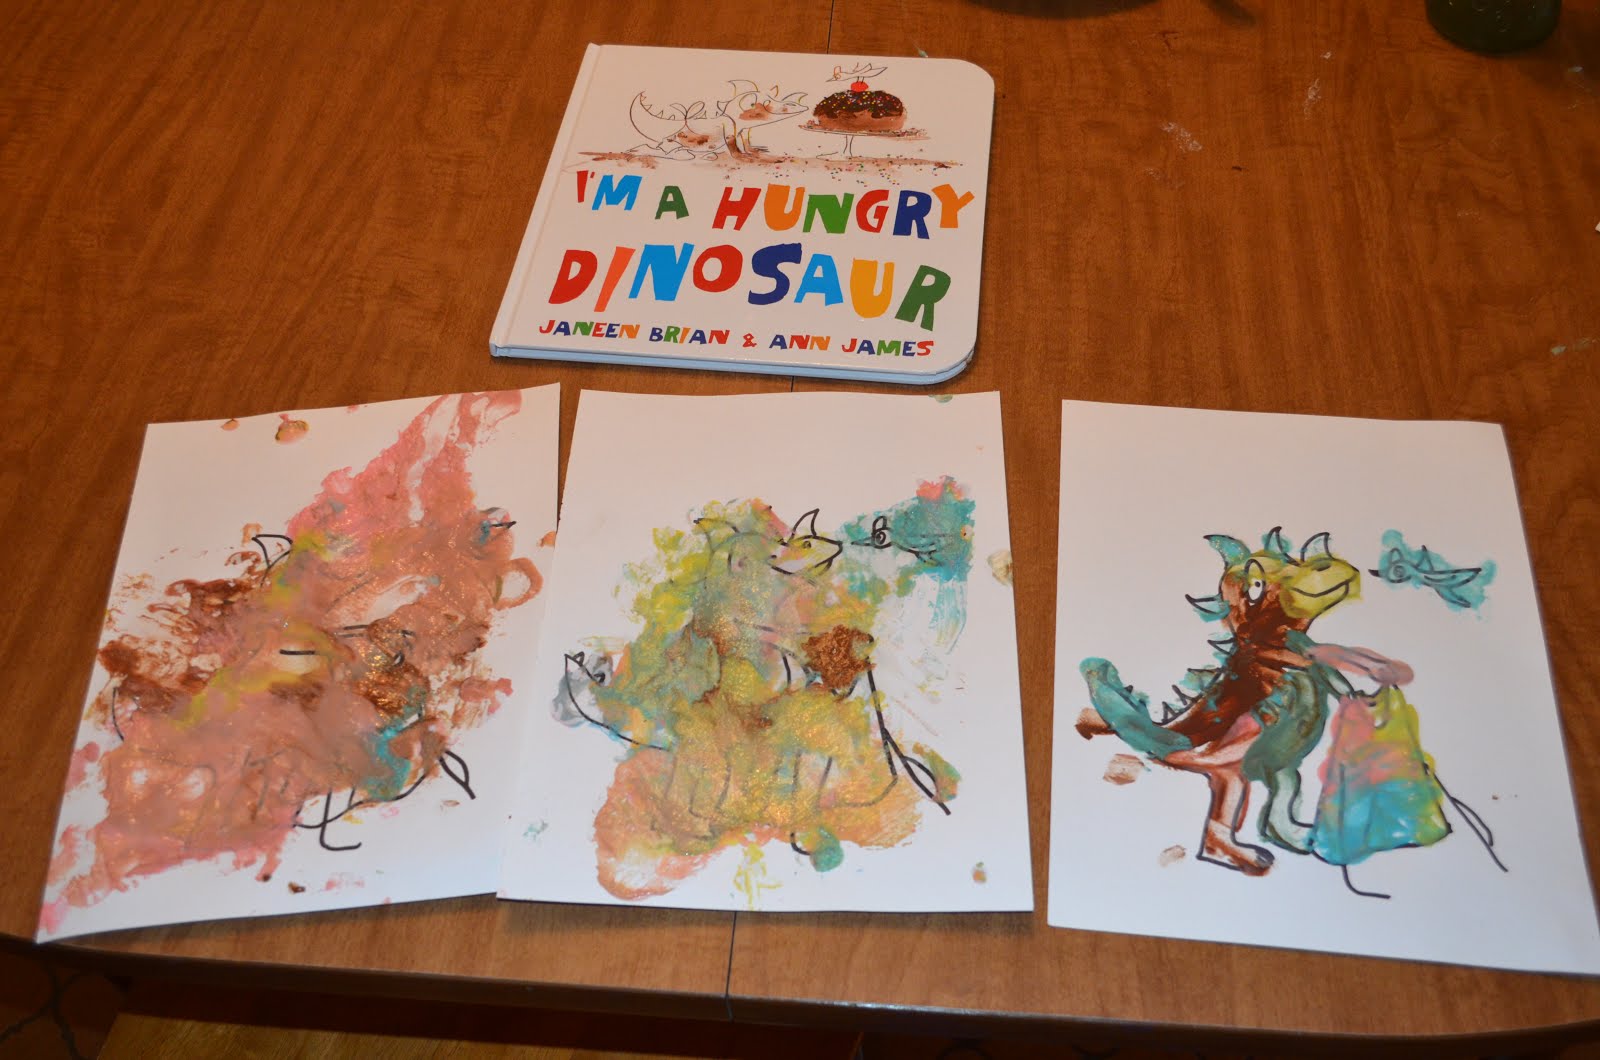
I'm A Hungry Dinosaur is beautifully written and illustrated and managed to steal our hearts again!  This time Ann James uses flour, cocoa, icing and sprinkles for her illustrations.  This is where my inspiration came from.  Why not let the kids do their own!?
I searched my baking cabinet for some fun stuff and decided, We were going to do this!  Please note; Do not tell toddlers that you are going to paint until you are ready.  This will result in them following you and asking every 5 seconds if you're ready yet....You would think I would know that.

To the FUN part..
You will need:

Flour
Cocoa
Water
Mixing Bowls
Whisk
Food Coloring
Paper (Card Stock, something sturdy)
Paintbrushes (we used our fingers!)
Sprinkles (optional, we were out)

I did not measure anything, I mixed some flour and water until I got a pancake batter like consistency.  I did the same thing for the cocoa.  I poured it into my separate bowls and added my food coloring.

BADABING BADABOOM!


Now the fun!  We read I'm A Hungry Dinosaur together and then they got to make their own flour and cocoa illustrations!  I traced a Dinosaur from the book but it would be just as fun to use a print of a cake!

The picture on the left was Lillian's response when I told her we were using our fingers, no paint brushes.

You can see from the photo on the right that she warmed up to the idea! <3


The kids had a lot of fun with this project but we will more than likely leave the real masterpieces to the professionals.  We are ready for summer time so we can paint with mud and become Dirty Dinosaurs! Grab both I'm A Hungry Dinosaur & I'm A Dirty Dinosaur right HERE!

I'm Back and still getting my craft on!

I've been MIA for a little while now...yeah, it's been more than a little!  We've had lots of new adventures and changes!  We've moved twice and have experienced lots of birthday's between the family!  This is our view on clear days (for now)!  Mt. Rainier is so beautiful!


The beginning of this blog which was Miss Lillian, is now 3 years old and is into everything!  She definitely is a big "helper" when it comes to crafts with Mom! 

I hope to be updating this more often!  Just in case you didn't know I'm now an Usborne Books & More consultant.  I've had lots of fun creating crafts that correlate with the books I read to the kids.  Sooo, why not share with all of you! HERE is my website; check out some of the awesome books.


I will be sharing (hopefully today) a craft that goes right along with one of our new titles, I'm A Hungry Dinosaur! The kids had a blast with this one! 


Thursday, October 4, 2012

Maternity Angry Birds Pig Costume!

My son has a thing for Angry Birds.  Last year he was the red angry bird and this year he wants to be the angry birds bomb (the black one).  I like to dress up with him on Halloween and this year I will be about to pop.  Sooo, I need a costume that will accommodate the big belluh!  That's if I make it that far (EDD Nov 5th).  Anyways I decided to keep it simple and just put a pig face on a green shirt.

For this project you will need:

Green Shirt (or Angry Bird Colored)
Various colors of felt for the face
hot glue gun
hot glue sticks
scissors
sewing machine
elastic
Face printout

I bought an XL shirt.  It is not a maternity shirt and figured it would give me plenty of room.  At first I was simply going to glue the face on but decided to put some elastic on the sides so that it would look more like a regular maternity shirt and I wouldn't have any gaping in the front.  The print out for the angry birds can be found here.  This link is for angry birds balloons but it serves the same purpose.


I traced the paper over the various colors of felt, then cut out the felt.  I glued the eye pupils and nose nostrils on their designated spots.

I then played around with the placement of my face.  I looked up a picture of an actual angry birds pig to see where things should be placed. 

So now that my face is cut out and ready to be put on the shirt I prepped the shirt.  My shirt during this time was in the wash.  Now it is done freshly dried and ready to go.  I am now going to attempt to explain how I did the ruching on the side.   I am not an expert seamstress by no means.  I still consider myself a beginner and most of the thing I do is by trial an error.  Someone more experienced I'm sure could make this look a lot better but this is just a Halloween costume I wasn't terribly concerned.


First I made sure my shirt was flat and ironed the sides so that I had a nice crease. I then did a loose stitch so that I could pull and creating the ruching effect.  I tried the shirt on to make sure the ruching would hit where I wanted it to.  Marked it with a pin, took shirt off, and tried to make sure that the ruching was evenly spaced.  I then pinned elastic to the ruched section.  Once pinned (make sure to change your thread spacing) I sewed the elastic on top of the ruched section.  And Voila, you can see the picture above on the far right is how it looks on.  I repeated the same process on the other side making sure that the ruching measured the same length from the underarm.

Now that my shirt is ready to go I pinned the face on while wearing the shirt.  I wanted to make sure the face hit my belly bump in the right place.  Aiden helped and decided that the crown should be centered up top and no ears.  I plan on making a hat or head band for the ears.

I might do something with the sleeves.  I haven't decided yet, they are a little too baggy for my taste.  :) This was extremely simple and super cheap! Aiden had to pose with me in his Angry Birds Red Costume.  We are a great match!! 

Thursday, September 27, 2012

AVENGERS mod podge fun!!

So as promised and just in time for the release of the Avengers movie, here it is Aiden's Avengers dresser!!


I was unable to find avengers scrapbook paper BUT I found wrapping paper!!  I used the same method as Lillian's mod podge dresser.  Since the wrapping paper is thinner than scrapbook paper you have to be careful not to use too much mod podge at one time.  Too much mod podge will wrinkle the paper.  Also, Once the paper is wet with the mod podge it will rip easily if not handled with care.

A side note: Thor has beautiful blonde hair and I'm kind of jealous...

Tuesday, September 25, 2012

Thrifty Telescope!

Lately Aiden has been on a pirate phase.  He wants to be a pirate and explore.  He likes to check the maps constantly and sometimes we even draw a map of our errands for the day.  He was using a paper towel ring thing as a telescope so I decided to decorate it a little.

For this project you will need:

Center Cardboard from a roll of Paper Towels
Material (doesn't matter what kind)
Felt for the ends
Hot glue & gun
Sewing machine
Scissors


I measured and cut my material to size, making sure that the material would wrap around the power towel holder.  Once my material is cut, I hemmed three sides as pictured below.  

 I then took my hot glue gun and glued the unhemmed side first to the paper towel holder.  I wrapped the material around then glued the hemmed side.  This gave the entire thing a finished look.

If your material does not line up with the ends of the paper towel holder, that is ok.  The felt ends will cover what is left.

I then took me pieces of felt (one black and one yellow, they seemed like good pirate colors) and wrapped it around the ends leaving a little hanging off the ends.  I glued it in place and then wrapped the edges into the paper towel holder, gluing them into place.  I did this same thing on the other end with the black felt.

 Once completed your telescope should look like the picture on the left.  Easy, simple, and provides entertainment for imaginative three year olds.


 This is Aiden wearing his telescope.  He was exploring outside on the tricycle.  He would stop occasionally whip out his telescope, look around, put it back and peddle some more.  :) It's the little things...


Friday, September 21, 2012

Tag Blanket!

When Aiden was little and sometimes to this day he still asks for his "Ravick" (his blanket).  It was a soft blanket with a silk edge and a tag that was silky and folded in two.  He would rub the tag together and play with it until he fell asleep.  I even sewed the tag back onto the blanket when it fell off.  When we started looking at blankets for Lillian, Aiden checked to make sure they had the right tag.  It was the cutest thing.  The single layer tags were a no go, but the silky tags that were folded in two were acceptable :) This brought me to this project.  The creation of the tag blanket.

For this project you will need:

Material
Ribbon
Scissors
Pins
Sewing Machine
Measuring Tape

The amount of material and ribbons you will need depends on how large you want the blanket to be.  My blanket is 15X15 and I have ten ribbons on each side.  Try and get ribbons that are various colors, sizes and textures.

First: Cut your material to the size you would like.  I have a cotton front with a fleece backing.  At first I was going to pin the ribbons directly in between the two pieces, sew it inside out and turn it right side out like a pillow BUT I decided to make a ribbon border.  You could do it either way. The above picture is what it would look like with the ribbon border.


Next: Cut your ribbon into pieces.  I cut my ribbon into four inch strips and separated them by color.  This just made things easier when pinning them to the fabric.  If you are going to use the pillow method for your blanket you need to put both pieces of fabric facing each other.  If you are going to use a ribbon you can pin the ribbons in between two pieces of ribbon.  The ribbon I used for the edge is two inches wide.

The photo below shows how I pinned the ribbon in between the two fabrics.  I tried to evenly space the ribbons apart, I did not measure.  I folded the ribbon in half so that the loop would stick out and simply pinned them.  I do not have pictures of the pinning of the ribbon border but it's the same process.


The photo on the below shows how the ribbons should look once sewn into the fabric.  You can see the loops which should keep baby entertained.  I sewed over each ribbon three times (forward, back, and forward again) to insure that the ribbons do not come loose.  Loose ribbons could be a choking hazard which is not good!

Once you pin the ribbons on all sides sew around the edges leaving a tiny opening, carefully turn the blanket right side out through the hole.  Once turned, sew the hole together.

If using ribbon strategically slide the ribbon border over the edge of the blanket material and sew into place.

My opinion 15X15 is slightly bigger than I expected.  I think a 10X10 blanky would be plenty big.  Overall I think this was a success and would make a cute baby shower gift for friends or a fun piece to keep baby occupied.  I hope Lillian enjoys her tags as much as her brother did.


Update: This evening 9/27 I made two tag blankets 8X8 that are perfect size for little hands!!

 The top I used an elephant print corduroy type of material, one with fleece backing and the other I used a piece of black satin.

I did not use a ribbon edge on these and they turned out really nice.  I used the pillow method, turned them right side out, and then stitched along the entire border.  This gives the edge a finished look and reinforces the ribbons even more.

Thursday, September 20, 2012

Tutu Wreath!

Omg this is the cutest idea EVER! I saw this PIN and with Halloween right around the corner I had to make one!

I followed the instructions pretty much as they are written there.  I added purple to make it look like my monster had spots :) I also could not find spools of tulle in the color that I wanted so I bought actual yards of tulle and just cut it.  AND I added the appearance of eyelashes on my monster, I just put longer length tulle behind the eyes.  I used about three yards, 2 of the green and 1 of the purple.

My finished product

BABAM!


For this project you will need:

Scissors
3 yards of tulle (any color)
2 Styrofoam balls
black paint (or sharpie)
paint brush
Piece of card stock for the teeth
Ribbon or fabric for the bow

I cut my Styrofoam wreath in half.  I was trying to be thrifty and thought "Hey, if I cut this in half I will not have to make my tulle as long and I can make two".  It worked but a round object would be much easier to maneuver the tulle around the wreath.  I also outlined my teeth with a black sharpie.  I think I might just stick a black piece of paper behind it to give it depth.  The original creator had a black door, I on the other hand have a white door.  It's still really cute and Aiden absolutely loves this little Monster.  We are looking forward to scaring Daddy when he gets home!