Thursday, October 4, 2012

Maternity Angry Birds Pig Costume!

My son has a thing for Angry Birds.  Last year he was the red angry bird and this year he wants to be the angry birds bomb (the black one).  I like to dress up with him on Halloween and this year I will be about to pop.  Sooo, I need a costume that will accommodate the big belluh!  That's if I make it that far (EDD Nov 5th).  Anyways I decided to keep it simple and just put a pig face on a green shirt.

For this project you will need:

Green Shirt (or Angry Bird Colored)
Various colors of felt for the face
hot glue gun
hot glue sticks
scissors
sewing machine
elastic
Face printout

I bought an XL shirt.  It is not a maternity shirt and figured it would give me plenty of room.  At first I was simply going to glue the face on but decided to put some elastic on the sides so that it would look more like a regular maternity shirt and I wouldn't have any gaping in the front.  The print out for the angry birds can be found here.  This link is for angry birds balloons but it serves the same purpose.


I traced the paper over the various colors of felt, then cut out the felt.  I glued the eye pupils and nose nostrils on their designated spots.

I then played around with the placement of my face.  I looked up a picture of an actual angry birds pig to see where things should be placed. 

So now that my face is cut out and ready to be put on the shirt I prepped the shirt.  My shirt during this time was in the wash.  Now it is done freshly dried and ready to go.  I am now going to attempt to explain how I did the ruching on the side.   I am not an expert seamstress by no means.  I still consider myself a beginner and most of the thing I do is by trial an error.  Someone more experienced I'm sure could make this look a lot better but this is just a Halloween costume I wasn't terribly concerned.


First I made sure my shirt was flat and ironed the sides so that I had a nice crease. I then did a loose stitch so that I could pull and creating the ruching effect.  I tried the shirt on to make sure the ruching would hit where I wanted it to.  Marked it with a pin, took shirt off, and tried to make sure that the ruching was evenly spaced.  I then pinned elastic to the ruched section.  Once pinned (make sure to change your thread spacing) I sewed the elastic on top of the ruched section.  And Voila, you can see the picture above on the far right is how it looks on.  I repeated the same process on the other side making sure that the ruching measured the same length from the underarm.

Now that my shirt is ready to go I pinned the face on while wearing the shirt.  I wanted to make sure the face hit my belly bump in the right place.  Aiden helped and decided that the crown should be centered up top and no ears.  I plan on making a hat or head band for the ears.

I might do something with the sleeves.  I haven't decided yet, they are a little too baggy for my taste.  :) This was extremely simple and super cheap! Aiden had to pose with me in his Angry Birds Red Costume.  We are a great match!! 

Thursday, September 27, 2012

AVENGERS mod podge fun!!

So as promised and just in time for the release of the Avengers movie, here it is Aiden's Avengers dresser!!


I was unable to find avengers scrapbook paper BUT I found wrapping paper!!  I used the same method as Lillian's mod podge dresser.  Since the wrapping paper is thinner than scrapbook paper you have to be careful not to use too much mod podge at one time.  Too much mod podge will wrinkle the paper.  Also, Once the paper is wet with the mod podge it will rip easily if not handled with care.

A side note: Thor has beautiful blonde hair and I'm kind of jealous...

Tuesday, September 25, 2012

Thrifty Telescope!

Lately Aiden has been on a pirate phase.  He wants to be a pirate and explore.  He likes to check the maps constantly and sometimes we even draw a map of our errands for the day.  He was using a paper towel ring thing as a telescope so I decided to decorate it a little.

For this project you will need:

Center Cardboard from a roll of Paper Towels
Material (doesn't matter what kind)
Felt for the ends
Hot glue & gun
Sewing machine
Scissors


I measured and cut my material to size, making sure that the material would wrap around the power towel holder.  Once my material is cut, I hemmed three sides as pictured below.  

 I then took my hot glue gun and glued the unhemmed side first to the paper towel holder.  I wrapped the material around then glued the hemmed side.  This gave the entire thing a finished look.

If your material does not line up with the ends of the paper towel holder, that is ok.  The felt ends will cover what is left.

I then took me pieces of felt (one black and one yellow, they seemed like good pirate colors) and wrapped it around the ends leaving a little hanging off the ends.  I glued it in place and then wrapped the edges into the paper towel holder, gluing them into place.  I did this same thing on the other end with the black felt.

 Once completed your telescope should look like the picture on the left.  Easy, simple, and provides entertainment for imaginative three year olds.


 This is Aiden wearing his telescope.  He was exploring outside on the tricycle.  He would stop occasionally whip out his telescope, look around, put it back and peddle some more.  :) It's the little things...


Friday, September 21, 2012

Tag Blanket!

When Aiden was little and sometimes to this day he still asks for his "Ravick" (his blanket).  It was a soft blanket with a silk edge and a tag that was silky and folded in two.  He would rub the tag together and play with it until he fell asleep.  I even sewed the tag back onto the blanket when it fell off.  When we started looking at blankets for Lillian, Aiden checked to make sure they had the right tag.  It was the cutest thing.  The single layer tags were a no go, but the silky tags that were folded in two were acceptable :) This brought me to this project.  The creation of the tag blanket.

For this project you will need:

Material
Ribbon
Scissors
Pins
Sewing Machine
Measuring Tape

The amount of material and ribbons you will need depends on how large you want the blanket to be.  My blanket is 15X15 and I have ten ribbons on each side.  Try and get ribbons that are various colors, sizes and textures.

First: Cut your material to the size you would like.  I have a cotton front with a fleece backing.  At first I was going to pin the ribbons directly in between the two pieces, sew it inside out and turn it right side out like a pillow BUT I decided to make a ribbon border.  You could do it either way. The above picture is what it would look like with the ribbon border.


Next: Cut your ribbon into pieces.  I cut my ribbon into four inch strips and separated them by color.  This just made things easier when pinning them to the fabric.  If you are going to use the pillow method for your blanket you need to put both pieces of fabric facing each other.  If you are going to use a ribbon you can pin the ribbons in between two pieces of ribbon.  The ribbon I used for the edge is two inches wide.

The photo below shows how I pinned the ribbon in between the two fabrics.  I tried to evenly space the ribbons apart, I did not measure.  I folded the ribbon in half so that the loop would stick out and simply pinned them.  I do not have pictures of the pinning of the ribbon border but it's the same process.


The photo on the below shows how the ribbons should look once sewn into the fabric.  You can see the loops which should keep baby entertained.  I sewed over each ribbon three times (forward, back, and forward again) to insure that the ribbons do not come loose.  Loose ribbons could be a choking hazard which is not good!

Once you pin the ribbons on all sides sew around the edges leaving a tiny opening, carefully turn the blanket right side out through the hole.  Once turned, sew the hole together.

If using ribbon strategically slide the ribbon border over the edge of the blanket material and sew into place.

My opinion 15X15 is slightly bigger than I expected.  I think a 10X10 blanky would be plenty big.  Overall I think this was a success and would make a cute baby shower gift for friends or a fun piece to keep baby occupied.  I hope Lillian enjoys her tags as much as her brother did.


Update: This evening 9/27 I made two tag blankets 8X8 that are perfect size for little hands!!

 The top I used an elephant print corduroy type of material, one with fleece backing and the other I used a piece of black satin.

I did not use a ribbon edge on these and they turned out really nice.  I used the pillow method, turned them right side out, and then stitched along the entire border.  This gives the edge a finished look and reinforces the ribbons even more.

Thursday, September 20, 2012

Tutu Wreath!

Omg this is the cutest idea EVER! I saw this PIN and with Halloween right around the corner I had to make one!

I followed the instructions pretty much as they are written there.  I added purple to make it look like my monster had spots :) I also could not find spools of tulle in the color that I wanted so I bought actual yards of tulle and just cut it.  AND I added the appearance of eyelashes on my monster, I just put longer length tulle behind the eyes.  I used about three yards, 2 of the green and 1 of the purple.

My finished product

BABAM!


For this project you will need:

Scissors
3 yards of tulle (any color)
2 Styrofoam balls
black paint (or sharpie)
paint brush
Piece of card stock for the teeth
Ribbon or fabric for the bow

I cut my Styrofoam wreath in half.  I was trying to be thrifty and thought "Hey, if I cut this in half I will not have to make my tulle as long and I can make two".  It worked but a round object would be much easier to maneuver the tulle around the wreath.  I also outlined my teeth with a black sharpie.  I think I might just stick a black piece of paper behind it to give it depth.  The original creator had a black door, I on the other hand have a white door.  It's still really cute and Aiden absolutely loves this little Monster.  We are looking forward to scaring Daddy when he gets home!


Friday, September 14, 2012

Fabric Picture Frame

As my sister was going through a box of fabric she came across this beautiful pink floral stuff that she used at one time.  I took the scraps thinking i would use them to make a quilt and remembered this little PIN.  So here we go, I tweaked it to suit my needs, and what I had on hand.

For this project you will need:

Material
Hot glue gun & sticks
Picture Frame (any size)
Scissors


First step is to cut your fabric in little strips, as seen below.  The number of strips needed will depend on the size of your frame.  If you didn't cut enough you can always cut more.  The tutorial above used different coordinating material which turned out beautifully.


You can start anywhere (I figured a corner would be best) I tried to make sure my material was not wrapped around the little fasteners that keep the glass and backing inside the frame.  Once you start wrapping the frame will look like this (picture below).  Simply glue one end, start wrapping the fabric, and glue the other end once you run out of fabric.  Start another piece where your first piece ended.  If my fabric ended on the front of my frame I simply cut it so that it was glued on the back


Wrap your fabric until your entire frame is covered.  And here you go!

BADABING BADABOOM!


Wednesday, September 5, 2012

Tissue Paper Pom Poms

As requested here is a little blurb about my tissue paper pom poms.

For this project you will need:

Tissue Paper (7-10 sheets required per pom pom)
Rubber Band
Fishing string (you know the clear plastic string)
Scissors

This idea is brought to you by this PIN.  This pin will take you to a more detailed tutorial.

This project is very simple.  Take your tissue paper in a stack, and fold it like an accordion, back and forth back and forth.  once the entire thing is folded use a rubber band or piece of wire to hold it together.  You can cut the ends so that it is either rounded or pointy looking.  My pom pom is a pointy one.  Then very carefully, so you don't rip the paper, separate the pieces.  Fluff it a little here and there until you get the look you want.  Tie your string to the wire or rubber band and hang it where ever you like.

VOILA!! 


I think this would look really cute alternating different colored tissue paper.  Good idea for baby shower, birthday party decorations or even decorating a nursery.  

Monday, September 3, 2012

Latest Project: Crochet Beanie

No, I am not going to tell you how to do this because I can barely read crochet directions.  This is something my sister showed me how to do years ago.  I only know a couple stitches and that's it...I might get a beginners book and then I can make all sorts of things, booties, hats, better flowers, maybe even a DINOSAUR...yeah probably not.

Anyways, You can find most tutorials on youtube and I googled to find the approximate size of a newborn babies head.  Lillian is due in the beginning of November so it should be cold...HA we live in southern VA there is NO telling what the weather will be like.


MOD PODGE ALL THE THINGS!

When Aiden was in diapers I would constantly lose his wipey cases.  I don't know where they went.  You know those socks monsters that live in the dryer?  Well, I swear I have a wipe case monster.  Anyways, I saw this PIN and thought to myself, "Maybe if it's pretty I won't lose it?" Hahaha we shall see how that works.  So far it is still sitting on my table so the Monsters may have retired.

Since I have discovered mod podge, I think I need to mod podge ALL THE THINGS!

*snort*

For this project you will need:

Wipe case
Mod Podge
Scrapbook paper (what I used)
Paint (maybe not, keep reading)

So I painted my wipe case (using the pink I used on the knobs of my dresser).  Paint doesn't stick to well to plastic, but I kept going.  I applied my scrapbook paper after cutting to fit the case and mod podged it all.  I think that the paint will eventually end up chipping off, so maybe painting it isn't the best idea.  This was super simple and took me maybe 20 minutes to do.

KABOOM!!


This is the case opened.  As you can see it is a travel case but you could also take this idea and apply it to the larger wipe cases.  Other ideas....You could hot glue ribbon, buttons, beads, etc.  This project gives you a lot of creative freedom.  I tried to find things that I already had and use what was left.  The paper, paint, and mod podge were all used to make the dresser.  I also used a Sharpie to write our last name on the case.  This would make an excellent piece to include in a baby shower gift!  


On to the Next One!

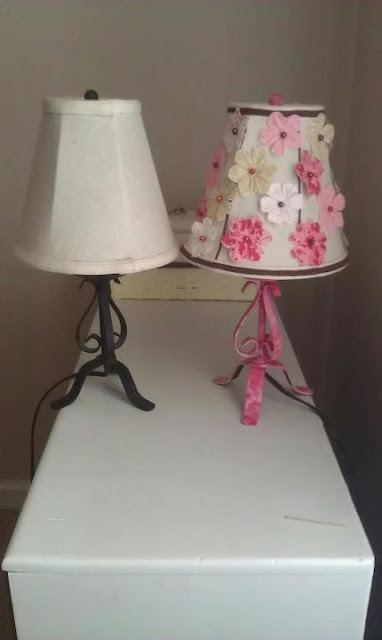
I did this last week.  It all started with this PIN.  But I broke all the rules and don't have a single button on my lamp.  My lamp base was a dark color and I wanted to make it pink.  So in order for the pink to show up I painted it white first (using the same paint I used on my dresser).  The lamp shade I pretty much outlined with some brown paint.  I then made a trip to our local craft store *squee*...That place makes me crazy! I found these really cute fabric flowers.  I thought to myself "PERFECT" I grabbed some beads for the center of the flower and some hot glue sticks and I was DONE!  Not really, the fun part hasn't even started!!

For this project you will need:

Lamp with Shade
Paint
Something Fun to apply to the lamp shade
Hot glue gun
Hot glue sticks

Placement wasn't really that important but it seems that I started a pattern without knowing it.  Right, left, right, left.

BAM!!


How cute is that?!?  You can see that I didn't just paint the base of the lamp.  I sort of sponged the paint on to give it a textured look.  

My First Project. Mod Podge Dresser

I am a pretty thrifty person.  If I can get something gently used rather than paying 100's of dollars I'm all over that!! My Mom and Dad gave me a dresser for Lillian's room.  It had some paint here and there on it and overall was just kind of dingy.  Well, I resurrected the beast and it is now pretty in various shades of pink!  I did not take a before picture of the entire dresser.  Blogging wasn't on my mind at the time.  This project showed me that I would make a horrible graffiti artist.  Seriously, that ish is hard! So after trying to spray paint it and failing miserably I bought some white paint and went to town.

For this project you will need:
Scrapbook paper (enough to cover the drawers)
Mod Podge
Paint Brush
Sponge Brush
Paint
Sand paper

Oh before I forget here is the link to the Pin Inspired...pin.

Ok, before I did anything I sanded everything down.  I wanted a good surface to make sure the paint/mod podge/ scrapbook paper stuck.  Next I painted the frame of the dresser white.

Below is a picture of the scarpbook paper that will be applied and the front of the drawers before I applied the mod podge and scrapbook paper.  


The front of the drawers should be sanded down.  You will then paint a thin layer of mod podge on the drawers (Oh make sure you take the knobs off!!) If the mod podge is to thick it will wrinkle the paper.  We don't want lumps! Now take into consideration the placement of your paper.  I did not do this.  You see that pretty stripped paper (cute right) well it made my drawers look like little flags. 


Do you see the flag appearance? 

Ok back to the details.  I gave the first layer of mod podge time to dry.  (we don't want wrinkles).  After it was dry I put another coat of mod podge over the paper so that it would sort of seal it all together.

While that was drying I painted my knobs.  I actually used a paper plat and inserted the screws in the plate.  It sort of held the knobs up so I could paint them without laying them down on wet paint.  This is an acrylic paint that I already had.  It is a brighter pink but I like the POP it gives to the dresser.

OK. The finished product!  I added a certificate looking piece of paper over one of the striped portions.  It has our baby girls name on it "Lillian Claire Bowen".  Once she is born I will fill in the date, with her weight and length at birth.  Now I didn't stop here.  As I said I didn't like the striped look.  So I found some adorable stickers and went to town! I'm sure when Lillian gets older she will have fun peeling them off but for now they are super cute!  


FINISHED!!

Now keep in mind this is something that can be changed as your child grows.  This is perfect for her nursery but as she grows and her interests change I can change the paper and BAM new furniture without the price.

Stay tuned for Aiden's Avengers Dresser.  Coming soon!


The Beginning

So with the coming of a new addition to our family (a baby girl) I have come across all sorts of neat craft ideas.  I think this is a twisted form of nesting.  Instead of cleaning I am crafting (AND making a bigger mess).  I was uploading my projects to facebook but figured I would start blogging about them.  Most of these things are (drum roll please) Pinterest Inspired!!  Ha! Go Figure!